Kubernetes Webhook 외부 인증 연동
Kubernetes 인증 관련 글 이동
1. Kubernetes 인증 ( Authentication ) 이론
2. Kubernetes 인증 ( Basic Authentication )
3. Kubernetes 인증 ( TLS )
4. Kubernetes 인증 ( Bearer Token )
5. Kubernetes 인증 ( Webhook )
6. Kubernetes 인증 ( Webhook 외부 인증 연동 )
7. Kubernetes 인증 ( Webhook 외부 인증 LDAP )
8. Kubernetes 인증 ( Proxy )
참고) 환경
Webhook Server
OS = CentOS 7
리눅스 커널 버전 : Linux 3.10.0-1062.el7.x86_64
Master Node server
OS = CentOS 7
리눅스 커널 버전 : Linux 3.10.0-1062.el7.x86_64
docker version : 1.13.1
api verison : 1.26
Worker Node server
OS = CentOS 7
리눅스 커널 버전 : Linux 3.10.0-1062.el7.x86_64
docker version : 1.13.1
api verison : 1.26
Kubernetes version
1.18

Webhook 외부 인증 Basic Authentication 서버 구축 및 적용
[목표]
Nginx Basic Authentication Server에 사용자 계정, 패스워드를 저장하고 있고
이 정보를 Webhook 을 통해 Kubernetes 와 연동하는 형태로
kubernetes 인증 서버를 구성.

1. Webhook 외부 인증 Basic Authentication 서버 구축
(WebHook 인증 서버를 구축할 서버에서 작업)
Basic Authentication Server는 container 로 실행 시킬것임.
docker 가 설치 되어있는 서버에서 진행
1.1. Nginx Basic Authentication Server 구축을 위해 Nginx 이미지 pull
[명령어]
docker pull nginx
1.2. Nginx 컨테이너 실행 후 컨테이너 들어가서 기본 tool download
[명령어]
docker run -d -it --name BasicAuthServer -p 8081:80 [nginx 이미지 id]
[명령어]
docker exec -it [컨테이너 id] /bin/bash
기본 tool download
apt-get update
apt-get install -y vim
apt-get install -y net-tools
apt-get install -y apache2-utils jq
apt-get install -y curl
1.3. htpasswd tool 로 id, password 생성
[명령어]
htpasswd -cb [생성할 디렉터리 경로] [ID] [Password]
예) htpasswd -cb userTest iksoon qwer


참고)
[계정을 추가하고 싶다면?]
htpasswd 명령으로 계정을 추가한뒤
동일한 파일에 추가하면 계정 여러개를 사용할 수 있음

1.4. nginx 설정파일에 htpasswd 생성한 계정 설정
/etc/nginx/conf.d/default.conf 파일 편집
[설정 추가]
auth_basic "iksoonAuthTest";
auth_basic_user_file "/userTest";

1.5. nginx 재시작해서 설정 적용
service nginx restart
명령을 하면 컨테이너가 종료될 것임.
docker ps -a
명령으로 정지된 container id 확인 후
docker start [container id]
명령으로 container 시작하면 상위의 설정이 적용되서 nginx 가 시작됨
1.6. nginx basic Authentication 확인
컨테이너 안에서
인증을 하지않고 일반적인으로 접근 : curl localhost:80
[결과]
인증 실패가 리턴됨

user와 password 를 넘겨서 접근 : curl --user iksoon:qwer localhost:80
[결과]
정상

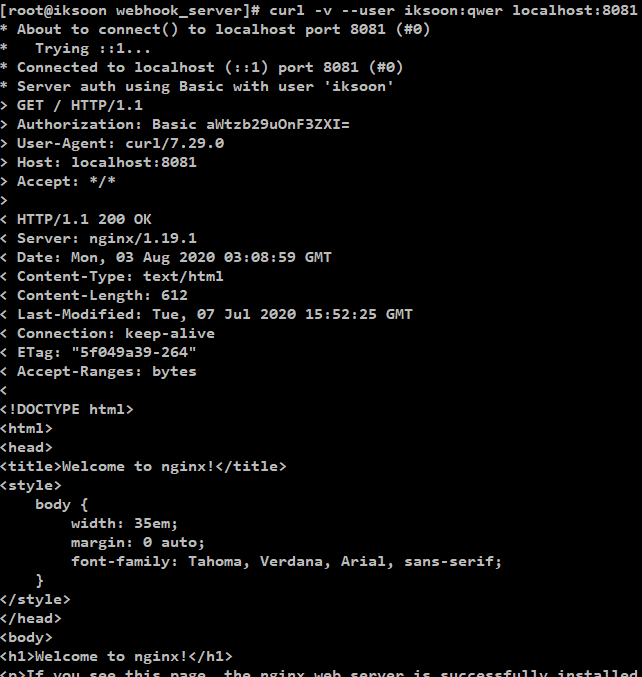
[아래 명령은 컨테이너 밖에서 컨테이너로 접근한 결과]
명령어 : curl -v --user iksoon:qwer localhost:8081
2. Webhook 인증 서버 구축을 위해 python 설치 및 flask 패키지 설치
(WebHook 인증 서버를 구축할 서버에서 작업)
CentOS7은 기본적으로 Python 2.7.5 version 이 설치되어 있음

Python 3.8 version 으로 변경하는 작업 진행
2.1. 먼저 python 설치 시 필요한 tool 설치
yum install -y gcc openssl-devel bzip2-devel libffi-devel wget
yum update
2.2. python 최신버전 설치
wget https://www.python.org/ftp/python/3.8.5/Python-3.8.5.tgz
tar xvf Python-3.8.5.tgz
cd Python-3.8.5/
./configure --enable-optimizations
make altinstall
2.3. python 3.8을 main 으로 쓸 수 있도록 링크 작업 진행
ls -l /bin/python*
unlink /bin/python
ln -s /usr/local/bin/python3.8 /bin/python
2.4. pip 명령으로 flask 패키지 설치
python3.8을 설치해서 pip3.8 명령으로 pip 를 사용해야함
명령어 : pip3.8 install flask
flask 란?
플라스크(Flask)는 아주 가벼운 마이크로(Micro) 서버 프레임워크.
마이크로라는 이름에 걸맞게 아주 작고 가벼우며, 빠르게 동작.
Flask는 서버 프레임워크에 필요한 핵심 기능만 제공하고,
나머지는 개발자가 직접 개발하거나 다른 패키지로 확장시켜서 사용되도록 유연하게 설계되어있음
3. Webhook 인증 서버 구축
(WebHook 인증 서버를 구축할 서버에서 작업)
[ iksoon-webhook2.py ]
(상위에서 구축한 Basic Authentication 인증서버와 연동하는 코드)
| from flask import Flask, request, jsonify import pprint import requests from requests.auth import HTTPBasicAuth app = Flask(__name__) @app.route('/', methods=['POST']) def auth(): # User가 kubernetes API Server에 인증 요청 # Kubernetes API Server 가 사전에 정의 된 Webhook Server로 REST 요청보낸것을 받아오는 코드 tokenReview = request.json print("\n") print("\n") pprint.pprint('---return result---') pprint.pprint(tokenReview) print("\n") # Webhook Server에 연동되어있는 인증 서버에서 인증 결과 받아옴 tokenReview['status'] = external_auth(tokenReview) pprint.pprint('---return result---') pprint.pprint(tokenReview) # Webhook Server에서 Kubernetes API Server로 인증결과 보냄 return jsonify(tokenReview) # 외부 인증 시스템 def external_auth(tokenReview): try: user, pw = tokenReview['spec']['token'].split (':') # localhost:8081 = 상위에서 생성한 Basic authentication server 주소 ret = requests.get('http://localhost:8081', auth=HTTPBasicAuth(user, pw)) status = {} status['authenticated'] = ret.status_code == 200 status['user'] = { 'username': user, 'uid': user, #'groups': ['system:masters'] # 주석 해제하면 관리자 권한 부여 } except: status = {} status['authenticated'] = False return status if __name__ == '__main__': app.run(host= '0.0.0.0', port=6000, debug=True) |
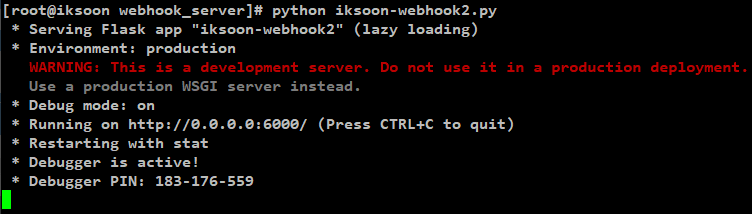
서버 실행 : python iksoon-webhook2.py
[결과]
정상 실행됨
4. Kubernetes Webhook 인증 설정 작업
(Kubernetes Master Node 에서 작업)
kubernetes 가 webhook 서버에 연결하기 위해 webhook server 의 정보를 설정해야함
설정 방법은 kubeconfig 파일(/etc/kubernetes/admin.conf)의 형식과 동일함
해당 설정을 kube-apiserver 가 가져감
참고(상위에서 작업한 webhook server ip) : 10.0.2.5
[ /etc/kubernetes/pki/webhook.yaml 설정 ]
주의) 경로가 상위 경로와 동일하게 하는것이 좋음
| apiVersion: v1 kind: Config clusters: - cluster: insecure-skip-tls-verify: true server: http://10.0.2.5:6000 # WebHook server의 주소를 명시함 name: kubernetes contexts: - context: cluster: kubernetes user: kube-apiserver name: iksoon-test@kubernetes current-context: iksoon-test@kubernetes users: - name: kube-apiserver |
/etc/kubernetes/manifests 경로의 kube-apiserver.yaml 파일 설정 추가
[설정]
--authentication-token-webhook-config-file=[상위에서 생성한 webhook 설정 yaml 파일 경로]
예) --authentication-token-webhook-config-file=/etc/kubernetes/pki/webhook.yaml

추가 후 적용 명령어 : kubeadm init --config kube-apiserver.yaml
또는
kubectl apply -f /etc/kubernetes/manifests/kube-apiserver.yaml
적용 후
kubectl get all -n kube-system 으로 상태 확인.
5. Kubernetes Webhook 인증 RBAC 연동
(Kubernetes Master Node 에서 작업)
RoleBinding 의 Subjects.kind.name 을
Basic Authentication server의 id 와 매칭 시켜주면
role 이 해당 id 에 적용 됨.
[예제 role.yaml 파일]
(role과 rolebinding 을 생성함)
| apiVersion: rbac.authorization.k8s.io/v1 kind: Role metadata: name: iksoon-role # 해당 Role 의 이름 namespace: iksoon-ns # Role 이 적용될 namespace 설정 (role 규칙은 모두 해당 namespace 에 적용되고 해당 namespace 만 사용가능) # 해당 namespace 는 미리 생성되어있어야함 rules: # 권한 부여 - apiGroups: ["", "extensions", "apps"] resources: ["deployments", "pods", "replicasets"] verbs: ["get", "list", "watch", "create", "update", "patch", "delete"] # you can also use ["*"] --- apiVersion: rbac.authorization.k8s.io/v1 kind: RoleBinding metadata: name: iksoon-rb namespace: iksoon-ns subjects: - kind: User name: iksoon # Basic Authentication server 에 등록된 계정과 동일하게 설정 namespace : iksoon-ns roleRef: kind: Role name: iksoon-role # RoleBinding 에 적용될 Role name을 넣어줌 apiGroup: rbac.authorization.k8s.io |

6. Client 에서 kubeconfig.conf 파일 작성
(kubectl 명령으로 붙고자하는 Client 에서 작업)
kubectl 을 사용할 client kubeconfig 파일 환경변수 설정 작업 진행
export KUBECONFIG="kubeconfig 파일 경로"
[ kubeconfig.conf 파일 예시 ]
| apiVersion: v1 kind: Config clusters: - cluster: insecure-skip-tls-verify: true certificate-authority-data: server: https://10.0.2.15:6443 # kubernetes master node 주소: apiserver 접근 포트 name: kubernetes contexts: - context: cluster: kubernetes user: iksoon name: iksoon-test@kubernetes current-context: iksoon-test@kubernetes preferences: {} users: - name: iksoon user: token: iksoon:qwer # [ID : Password] Basic Authentication Server에 등록되어있는 ID, PW를 입력 |
kubeconfig.conf 로 KUBECONFIG 환경변수가 설정되어 있어서
kubectl 명령하면 default 로 KUBECONFIG 경로를 참조해서 동작함
7. 결과 확인
(kubectl 명령으로 붙고자하는 Client 에서 작업)
client 에서 kubectl 명령 실행 결과
[결과]
정상
현재 kubernetes default namespace 에서 생성된 pod 가 없기 때문에 아래와 같이 나옴

만약 인증에 실패했을경우 아래와 같은 결과가 나옴

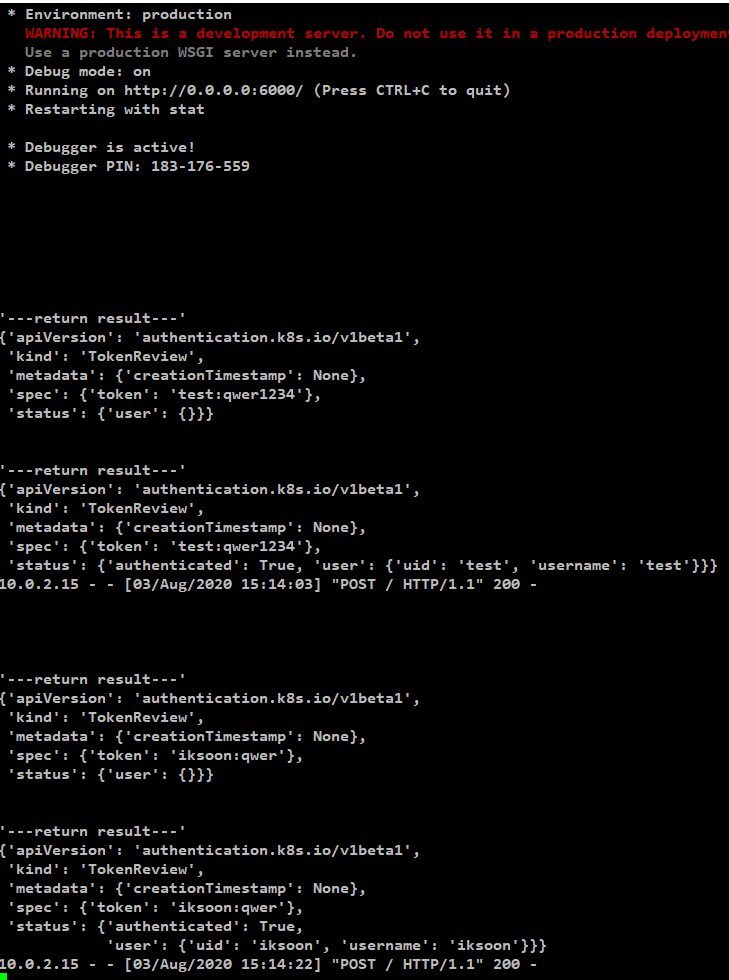
결과 성공 시 webhook flask server log 상태
아래와 같이 flask 코드에서 무조건 성공으로 리턴하는 data를 확인할 수 있음
예제는 Token을 ID:Password 형식으로 전달했지만
실제 요청은 해당 ID:Password 를 Base64 encoding (혹은 유사한 encoding) 방식으로 보관하는것이 좋음
제 글을 복사할 시 출처를 명시해주세요.
글에 오타, 오류가 있다면 댓글로 알려주세요! 바로 수정하겠습니다!
참고
webhook 참고
https://learnk8s.io/kubernetes-custom-authentication
https://kubernetes.io/docs/reference/access-authn-authz/authentication/#webhook-token-authentication
webhook 개념
https://smjeon.dev/etc/webhook/
'Kubernetes > Kubernetes 보안' 카테고리의 다른 글
| Kubernetes 인증 ( Proxy ) (0) | 2020.08.29 |
|---|---|
| Kubernetes 인증 (Webhook 외부 인증 LDAP) (0) | 2020.08.29 |
| Kubernetes 인증 ( Webhook ) (0) | 2020.08.29 |
| Kubernetes 인증 ( Bearer Token ) (0) | 2020.08.29 |
| Kubernetes 인증 ( TLS ) (0) | 2020.08.23 |